AutoCAD courses (AutoCAD) "GTsDPO" in Moscow - training in a universal software package for automated 2D and 3D design tools.
Classes are held in an interactive format. Teachers promptly give answers to emerging questions, help with difficulties that arise when completing assignments. By moving away from traditional lectures and focusing on the development of practical skills, the training material is easily absorbed by students who do not have experience with Autodesk software products.
Course objective:
- maximize the basic capabilities of the system for building technically competent and accurate drawing documentation - AutoCAD;
- to teach how to create, edit and print drawings of various levels of complexity and orientation.
Who are the AutoCAD beginner courses aimed at?
First of all, knowledge of the AutoCAD program is necessary:
- students of technical universities;
- designers;
- architects;
- designers-designers;
- builders;
- specialists who solve substantive problems in the field of land use and land management.
Autocad as the main stage of the global design process
Why the autocad program is so popular, and the specialists of this technological platform are in great demand. Because autocad is the beginning of any global design process in construction, engineering, design. Therefore, according to statistics, those who want to study autocad 2018, the most a large number of. Various architectural bureaus, design studios, design organizations and those who just want to fill the classrooms of the training center every day. But that's not all, the dynamics is such that there are more and more people who want to be trained in AutoCAD from scratch. Obviously, this is due to the fact that the pace of construction in the country is becoming gigantic, and the requirements for technical and technological design standards are constantly increasing. Architectural structures are becoming more and more complex forms. And as you know, autocad allows you to adhere to the most modern design standards. There are more and more professions that require the ability to work in autocad, and their popularity is constantly growing. If you are a novice specialist in the field of construction or design, then the sooner you complete the autocad training for beginners, the faster you can find a prestigious job and join the team. For training in AutoCAD, the courses attract the most experienced teachers - practitioners who are able to reveal the topic of any lesson in the most accessible form.
What can you learn in AutoCAD courses?
- confidently work with interface tools;
- form, modify and edit two-dimensional objects;
- prepare and print drawings;
- perform the construction and modification of 3D objects.
How the learning process of Autocad is built
Firstly, autocad training courses are divided into several levels according to their complexity. At the first level, the basic capabilities of the program, 2D flat drawing and drawing design, are mastered, at the second level, 3D modeling tools are considered. Secondly, autocad computer courses pay special attention to practical application programs. As part of the course, several projects of different complexity are created, where the use of basic drawing tools or the creation of three-dimensional objects is considered. All projects are accompanied by teachers individually considering each. Thirdly, autocad training courses in Moscow, upon completion of the training process, provide an opportunity for students to contact the training center for advice or additional training, i.e. support is provided to students, both at the stage of training and after completion. It is worth noting that the learning process becomes effective when the student practices independently, doing homework or implementing his own project. The autocad program requires constant practice.
Requirements for initial training:
- The program of this AutoCAD training course is designed for students who are confident in working with a PC.
Prospects for further employment:
If you have a specialized education, having mastered curriculum course of computer design for training AutoCAD (AutoCAD), you can successfully apply for employment:
- in design and construction organizations;
- in design bureaus;
- in design studios.
Graduates who want to expand their knowledge base have the opportunity to continue their education by choosing the right direction among the computer courses of the GCCPE.
Course Curriculum
- Program interface. Opening a document. Screen areas. Setting. Types of mouse pointer.
- World and user coordinate systems. Menus, lines and toolbars. Command line, text window, dialogue with the program.
- ZOOM tools and commands. Updating and regenerating a drawing.
- Line tool.
- Coordinate systems (absolute, relative, polar). Ways to enter coordinates.
- Finishing work and saving the drawing. File types used in AutoCAD.
Topic 2. Working with objects. Working with primitives
- Units.
- Workspace modes.
- Ways to enter commands and their completion. Command options and options for their selection. Cancel commands. Command return. Repeat the last command and previously used commands.
- Construction from the end of the segment. Selection of objects. Selection by a frame, types of a selection frame. Cancel selection.
- Remove objects, eraser.
- Construction modes: orthogonal mode, polar mode.
- Grid and binding. Permanent and one-time (temporary) object snaps. object tracking.
- Primitives in AutoCAD: point (using and changing the type of point), rectangle, circle, polygon arc, ellipse, elliptical arc, spline, construction line.
- Hatching: hatching of one, nested, several objects. Gradient fill. Hatching properties: associativity, transparency, background. Hatching editing.
- Creation of new drawings. Inserting ready-made drawings or their fragments.
Topic 3. Modification of objects
List of main questions to be studied:
- Tools of the Editing panel and their options: move, offset by a specified distance, copy, rotate, scale, mirror, array, 3D alignment, trim and extend lines, chamfer, fillet. Tools "gap", dismember ("blow up").
- Modification with handles.
Topic 4. Working with layers: creating and setting.
List of main questions to be studied:
- Working with layers: creating, editing, setting parameters, etc.
- Building axes.
- Working with objects: quick selection, changing properties, etc.
- AutoCAD Control Center (DesignCenter).
Topic 5. Working with text
List of main questions to be studied:
- Text: single line and multiline text. Text editing. Special symbols. Text scaling. Alignment. Creation proper fraction.
- Creating text styles.
- Find and replace text.
- Spell check.
- Callout. Callout style.
Topic 6. Working with dimensions
List of main questions to be studied:
- Dimensioning: simple dimensions.
- Complicated sizes. Accelerated installation. Various ways size editing. Dimension styles. Scaling objects with dimensions.
- The concept of annotative dimensions.
- Measurement tools. Methods for measuring area. Convert units of measure with a quick calculator.
Topic 7. Working with polyline and multiline
List of main questions to be studied:
- Poly lines. Poly line editing.
- Multi lines Editing multi lines.
Topic 8. Blocks
List of main questions to be studied:
- Block creation. Block insert. Insert blocks using the control center.
- Save block to file. Inserting a block from a file.
- Block editing. Block cutting.
- dynamic blocks.
- Creating a palette of tools from blocks.
- Removing unused blocks. Renaming blocks. Cleaning up a drawing using the Cleanup tool.
- Block text attributes. Editing block attributes. Extracting data from blocks with attributes.
Topic 9. Printing a document
List of main questions to be studied:
- Creation of named custom coordinate systems and techniques for working with them (on the example of a construction drawing).
- Insert drawings. Editing and cropping pictures.
- Seal. Manual setup (layout). Paper space and model space. Setting sheet parameters, creating viewports, drawing layout, scaling.
- Saving the file in PDF format. Create multi-page PDFs.
AutoCAD over the three decades of its existence has become the most popular tool for creating and processing two-dimensional and three-dimensional drawings on a computer. It is used in all areas where they work with drawings.
Autocad - a universal tool for an architect, engineer, builder
Autodesk AutoCAD is one of the most popular and most used 2D drawing and 3D modeling software for builders, engineers and architects. last decade proved that the trend of popularity of this program will only increase, and specialists working in autocad will be the most in demand and valuable. The trend of learning - autocad for beginners is in the trend of all professionals in this industry. Autocad allows you to solve almost all design and modeling tasks. Therefore, the autocad training program for beginners is what any civil engineer or designer should start their journey with. Starting to study autocad from scratch, everyone will learn for himself, firstly, how to learn how to draw in autocad from scratch, and, secondly, how to draw up drawings in accordance with GOST. These two factors are perhaps the most valuable, since the ability to draw and design is the most popular.
AutoCAD is most in demand in the following industries:
- Architecture and construction.
- Industrial design and interior design.
- design bureaus.
- Telecommunication companies.
- Geodesy and cartography.
For some industries, taking into account their specifics, separate versions of the program are created. For example, AutoCAD Electrical is designed specifically for electrical equipment designers.
How Autocad is suitable for interior designers
Autocad is tightly integrated with 3ds Max and Revit, which makes it possible to use autocad designers interiors too. Quickly and conveniently creating an interior drawing in autocad, you export it to any of the programs and continue to be creative there. This is a very important feature of the program, one often hears the question whether the AutoCAD training program for beginners is suitable for me, in almost all cases the answer is yes. The fact is that in the 3ds Max program, which is positioned as a program for designers, there are no drawing tools at all. And if we need filigree accuracy when carrying out an interior design project, then autocad is indispensable here. In the Revit program, which is also used by interior designers, although there are tools for creating drawings, but, as practice shows, the most convenient and optimal solution is to use autocad drawings in Revit. Therefore, working with the autocad program for beginners is something that will suit most specialists from various sectors of construction, engineering or design.
Main features and functions of the program
AutoCAD was conceived as a complete replacement for the draftsman's and designer's arsenal. Drawing board, paper sheets, pencils, rulers, protractors, erasers, compasses and other tools migrated to the computer screen. And in addition to this, the user received hundreds of other tools developed already in the digital environment.
The basis of work in the program is still the same as when drawing by hand. That is, the construction of drawings of any complexity using the simplest graphic elements - segments, circles, arcs. However, in addition to this, more than 5,000 specialized applications developed for various industries complement the functionality of AutoCAD.
Benefits of AutoCAD before regular drawings:
- Absolute accuracy of all lines.
- The ability to make adjustments to the drawing of any scale and complexity.
- Unlimited workspace.
- Convenience of electronic format - the drawing can be quickly copied, prepared a modified version, sent by e-mail.
- By working with layers, you can create complex drawings with object overlays, such as master plans for buildings, in which various communication systems are displayed on separate layers.
- The ability to use old developments - ready-made drawings and 3D models of various typical objects.
- Automation of many operations in the preparation of drawings - for example, automatic dimensioning for segments, calculation of areas, volumes.
- A rich toolkit for working with 3D objects - building isometric projections based on 2D drawings, simulating illumination.
- Easy integration with other Autodesk software - 3ds Max, Corel Draw, Archicad, Inventor, Civil 3D.
Autocad is the most popular program in the construction and mechanical engineering industry.
Since autocad solves almost all the tasks facing the designer on one technological platform, the demand for specialists who own this program is the highest. Having mastered autocad from scratch, having understood the principle of how work with the autocad program for beginners is built, any specialist will significantly expand the scope of his professional capabilities. Starting to take the autocad course for beginners, make sure that the program is already installed on your home computer. To do this for free, visit the Autodesk Education Community and you will be given the opportunity. How to learn how to draw in AutoCAD from scratch, you will be shown not only by your course instructor, but also by the means of the program itself, which are so intuitive that your first steps in AutoCAD will be as comfortable as possible. We report this because there is an opinion among some listeners about the excessive complexity of the program. Nothing like this. Everything is available.
- Don't take on everything at once. AutoCAD has many faces, and it can take years to master all its tools and features. Therefore, at the beginning of the journey, concentrate only on universal tasks - such as building 2D drawings, working with layers, working using ready-made templates. It makes sense to study specific tools when you know for sure that you will need them in practice.
- Don't reinvent the wheel. When preparing a complex drawing or model, you often have to use various typical elements - windows, doors, furniture, architectural elements, bearings, and much more. You can not draw most of these elements yourself, but look for ready-made options on the net, and, if necessary, correct them for your project.
- Customize the program for yourself. If you often have to make similar drawings or design them in the same style, create your own settings templates for this and specify the parameters you need in them. To prevent these templates from being lost, save them on a separate flash drive or in the cloud. Toolbars in the ribbon can also be easily dragged with the mouse, swapped between each other, putting those that you use most often in the most convenient places.
- Help is always there. In the upper left corner of the main program window there is a large button with the letter "A". This is not just a program logo. Clicking on it will bring up the search bar. Useful when you forget the right command. Enter the name of the command in the line, and the program will give you a list of suitable options.
- Save more. This should become your habit when working in the program. Don't forget to press Ctrl+S every three to five minutes, or after every successful streak.
- Make drawings in sheets. AutoCAD has an unlimited working field, which cannot be said about paper. But drawings sometimes need to be printed. Get used to immediately splitting large drawings into standard sheets - A4, A3, and so on.
How much can you earn with AutoCAD
Poskol Because the ability to work in this program is necessary in a variety of industries and professions, the level of salaries in these vacancies is also very different.
A small overview (the average salaries in Russia are indicated, October 2016, data - Yandex.Work):
- Project managers (construction) - 70 thousand rubles, while there are dozens of vacancies with a salary of 100-120 thousand rubles and more.
- Chief project engineers - 55 thousand rubles, also with the prospect of 100-120 thousand rubles.
- Architects - 54 thousand rubles.
- PTO engineers, estimators - 50 thousand rubles.
- Designers - 50 thousand rubles.
- Interior designers - 42 thousand rubles.
- Technical specialists - 38 thousand rubles.
- Design engineers - 34 thousand rubles.
In Moscow and St. Petersburg, the level of salaries for these specialties is higher. In addition, within the categories themselves, the difference in the level of wages can reach 2-3 times. But in general, the trend is clear - a person with knowledge of AutoCAD can count on a fairly high salary and career growth.
Where to learn how to work in AutoCAD
Autodesk has a smart marketing policy. The company cooperates with the highest educational institutions around the world, offering them special free versions. Therefore, if you are going to study, for example, at the Academy of Architecture and Civil Engineering or another technical university, then surely AutoCAD will be included in the curriculum. Thus, the development company makes sure that representatives of technical specialties are already familiar with their product from their student days.
If you have not received a profile technical education, but want to master AutoCAD - there are two more options left:
1. Self-study
To do this, you can use numerous textbooks and video courses. Many of them are available online for free.
The advantages of this approach- that you work at your own pace, at a time convenient for you, choosing the most suitable material for you.
Minuses - Not everyone has enough self-discipline for self-study.
2. Specialized courses
Here you will receive a set of knowledge on this product in a short time, comparable to what students of specialized technical universities receive.
Advantages of face-to-face courses:
- The acquired knowledge is immediately consolidated by practical exercises.
- At any time, you can contact the teacher for help.
- Working in a group - you can communicate, share experiences.
GCCPE is an Autodesk Authorized Training Center, so our graduates receive international certificates recognized not only by Russian companies, but also abroad. The AutoCAD training course consists of 9 lessons with a total duration of 36 academic hours. The program is designed for users who begin to master AutoCAD from scratch.
If you have searched a bunch of sites for teaching this program, reviewed a lot of AutoCAD video tutorials, but did not get the desired result, then this article will definitely help you!!
All videos AutoCAD tutorials, training courses, all articles and publications chew on every command and function, which becomes boring and uninteresting. I propose fundamentally new approach to learning AutoCAD. After reading this article, you can get to work and do whatever you want!
This program is intended primarily for making drawings, because its development started back in 1982, and the first version was an ordinary electronic drawing board. Further, with the development of CAD (computer-aided design) technologies and 3D modeling, 3D functions were added. And many features that have eradicated routine operations. But, as in life, before we learn how to run, we need to learn how to walk, and even earlier, how to stand on our feet.
If you decide create drawing in autocad with your own hands, then you should have at least a small concept of space and geometry, at least school level. To draw a line, you need two points. To draw a circle, you need a center and a radius. Did you know it? Then everything else will be easy!
How to download and install AutoCAD, you can read here.
And so this miracle beast is on your computer. Let's run it. We will work in AutoCAD 2014, practically keeping up with the times. Because at this moment there is already AutoCAD 2015. But I will tell you that starting from the version of AutoCAD 2010 there are no special differences. Therefore, having any version from 10 to 14, except for versions LT (abbreviated edition), we continue.
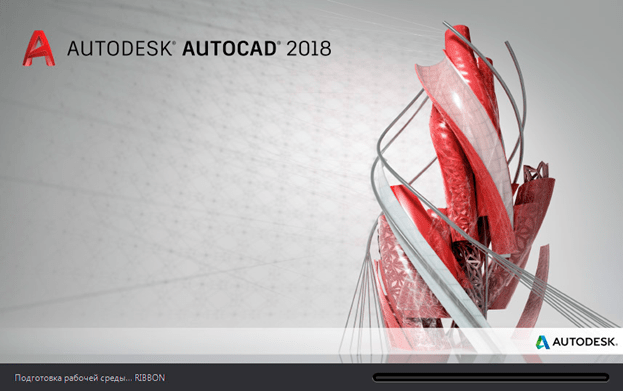
The loading window looks nice and modern.

The first thing we see after launch is the AutoCAD Assistant. We see extension learning blocks and those that I sometimes use - recent files, create and open, but so far we don't need it. We close this window. Top right. All windows have a standard windows window structure at the top right, three buttons - close, minimize, and maximize. Sometimes there are none if it makes no sense to execute them for a given window. After closing the assistant, we see:

This is what the main AutoCAD window looks like. At the top is a ribbon interface that makes it easier to work with than standard panel interfaces. If this is not the case for you, then in the lower right corner, click on the gear icon and select "Drawing and Annotations".

And so, now the most interesting! Now you can draw!!
Decades of development of this program have made it alive in the truest sense of the word. If you are attentive, he will answer all your questions himself.
To create a drawing of any complexity, about 15-25 teams are enough, which are located in three blocks in the most visible place.

Click on the inscriptions under the ribbon blocks and get the detailed functions.

Under most of the buttons, there are triangles that also bring up a context menu.
We know that the world is made up of molecules. So any drawing can be created from primitives. As soon as you click on any icon. A dialog with the program will appear at the bottom of the command line. Read carefully and you'll be fine!!
For example, the segment command. Select the first point then the second point whatever is specified on the command line.
The program is intuitive, if you hover over the button and wait a couple of seconds, a hint will appear on how it works.
Esc- deselect, cancel action,
Del- delete selection
ctrl+z- take a step back
Turn the wheel to zoom in, zoom out
Click on the wheel + move the mouse to move the drawing.
Read the command line, use these three panels and everything will work out! If you have drawn a segment that does not fit in the allocated space, on the command line, write the command - REGEN and press Enter.
With these commands, you can draw everything. I did not deceive, if YOU now think so. It will be long, difficult, tedious, but possible. If there is a desire
Autocad video tutorials
Getting Started in AutoCad
Part 1
Part 2
The lesson will be useful for novice users who are just starting to get acquainted with Autocad or have a zero level of knowledge about this program. Thanks to this lesson, you will learn how to navigate the program and take the first steps in mastering it.
After watching this video tutorial you:
- get to know the program
- learn the purpose of the main panels
- Familiarize yourself with the main drop-down menus
- learn how to open and create drawings, as well as save drawings in different versions of AutoCAD
- learn how to customize the screen background
- view comparison AutoCad interface 2007 and 2009, and learn how to customize Autocad 2009 so that it looks like all previous versions of the program.
Basic commands
Part 1
Part 2
Part 3
Part 4
In the lesson, we will consider the main commands and how to enter them. Let's consider a straight line, input of distances, a polyline, a point, a rectangle, a polygon, an arc, a circle, an oval, a spline, etc. Transforming an object into a block. Scaling, rotation, hatching. We will learn to recognize the area of an object, the perimeter, write text, make tables.
Selecting objects and managing window and space in AutoCAD
Various selection methods. Delete, zoom in, move the image. Turn panels on and off.
Modifying and editing objects and drawings
Part 1
Part 2
Part 3
Part 4
Through this lesson you will learn:
Delete drawing elements
- do mirror reflections
- undo wrong actions
- use offset functions, selectively copy, copy with base point, copy, circular and rectangular array, move, flip, stretch, crop, lengthen, break at point, object break, object connection, explode
scale objects,
- chamfer and round corners
edit objects with just one mouse
Lesson duration 30 minutes
Download to view on your computer:
To download the file, register on the site.
We set the dimensions on the drawing
Part 1
Part 2
Part 3
In the lesson, we will study all the commands used for sizing. We will learn how to put down the coordinates of points, measure various geometric figures, manage sizes, change the font and text size in size, change arrows to dashes, and more.
Printing drawings from AutoCad
The video tutorial discusses in detail the issues of printing from AutoCad. Different ways to print drawings, the secrets of scaling.
Thanks to this lesson, you:
The duration of the lesson is 10 minutes. The video lesson discusses in detail the issues of printing from AutoCad. Different ways to print drawings, the secrets of scaling.
Thanks to this lesson, you:
- you will be able to correctly print drawings from the model and sheets tabs
- change formats and orientation of sheets
- learn how to edit the drawing scale
- master bulk printing through dwf publishing
Lesson duration 10 minutes
Download to view on your computer:
To download the file, register on the site.
Lessons for the site were provided free of charge by Dmitry Rodin, you cansee more tutorials by clicking on the picture of the box.
Video tutorials on autocad, the fastest and easiest system for learning basic features on video examples for making drawings, building images. Video lessons demonstrate the basic functions of AutoCAD, and also contain examples of creating real drawings for architecture and mechanical engineering. I hope these video tutorials will make your learning and daily work easier.
The author perfectly teaches how to work in the program, everything is told in an accessible and understandable language using live examples. These video tutorials are the most effective and fast way master AutoCad. The lessons will be useful for both beginners and professionals who will be able to adopt methodically correct methods of work, which will greatly facilitate their lives and speed up their work.
So, ? Have you read this sentence? Fine! So it's time for us to say hello! Good day! We are very pleased to welcome you to our website. A separate section of which is devoted to one of the most popular programs in the construction industry around the world. In Russia, including from Autodesk.
Written about this software great amount articles/notes/textbooks and other literature. Our site will not be the first to teach you how to get started with AutoCAD.
Our articles and educational materials compiled in such a way that the final result, aimed at mastering all the necessary functions of AutoCAD CAD system, was achieved in the shortest possible time.
With an efficient implementation system theoretical knowledge in practical significance for each of you.
And most importantly - training on our website is absolutely FREE!
There are always people who ask: "?". Or they don't know how to ask and where to start.
So it's time to start our work. As we promised, there will not be a lot of unnecessary chatter and abstruse phrases from textbooks or other literature. Only Q&A. And anticipating your first question: Where to get Autocad?”, - we answer: “Go to the site https://www.autodesk.ru” and register there to get a full-featured version of AutoCAD for educational purposes absolutely free.
If you have any problems registering or installing the program, be sure to read our article "Registration on the Autodesk Education Community website" and "". In the meantime, we believe that you have AutoCAD version 2018 or lower installed on your computer. But not lower than 2013.
How to get started in AutoCAD? Getting started!
And so, we are looking for a shortcut on the desktop to launch it and run it!
A rather complex and powerful program, but despite this, it can work on not quite new computers. However, this depends on the complexity and size of the files you are working with.
In other words, if you have a large complex drawing, then it will require more computing power from the computer.
But launching a program is always a slow process. So be prepared to wait a bit.

You can speed up the launch of AutoCAD by installing the program on a modern high-speed solid-state SSD drive.
After starting the program, you will see the program window:
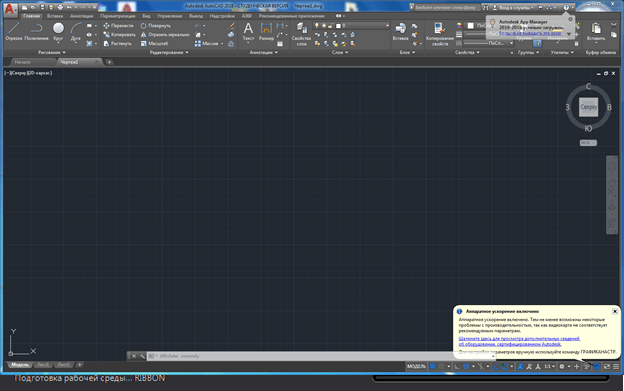
We have specially highlighted the most significant elements of the interface of the AutoCAD window with different colors. And now let's talk about each of them. Top/down, left/right and in order! J Let's go!

The button for calling the main menu of the program is surrounded by a red rectangle, with the help of which you can "Create a file", Open an existing one, Save, Print or Export a drawing file to another format.
For example, in PDF format, for viewing on a computer where AutoCAD is not installed. Or for demonstration to the customer. There is also a list of the latest files you have worked with for quick and easy opening.

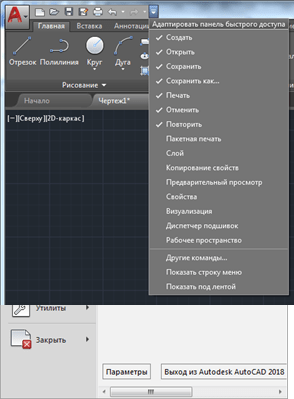
Highlighted in green is the "Quick Access Toolbar", which contains commands from the "Main Menu", as well as other useful commands.
The contents of the panel can be customized by clicking on the button with a small triangle at the end of the panel, pointing down.
The panel adaptation menu will open and by checking or unchecking the necessary checkboxes, we add or remove command buttons from the panel.
The name of the program, license type and file name are displayed in the center of the title bar of the window. "Drawing 1.dwg" is the "default" name of the AutoCAD file and will change when we save the file under our own name. ".dwg" is an AutoCAD file extension. Because of this abbreviation, Russian-speaking users also call AutoCAD files “devageshki”.
On the right side of the title window is the "Cloud Menu" which allows you to access background information and cloud services from Autodesk.
Below, in blue, "Team Ribbon" is highlighted. AutoCAD, like many programs, has a modern "ribbon interface" that allows you to optimize the window's workspace.
Giving the user access to the necessary commands in the minimum number of mouse clicks.
The name of the "active" ribbon of commands in the figure is underlined with a blue dotted line "Main". Clicking on other tabs activates the transition to them.
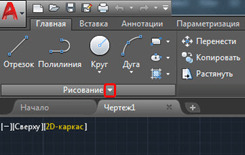
Each team ribbon is divided into "Areas". For example, in the figure blue the area of commands "Drawing" is highlighted in color.
The names of the areas were not chosen randomly. They tell the user which buttons of which commands are collected on this area.
For example, the buttons in the "Drawing" command area are responsible for creating 2D primitives and other elements (circle, rectangle, arc...).
Button interface element
Separately, I would like to note the interface element of the command buttons, which is found on different areas different buttons have a “small triangle” pointing downwards.
It tells us that this button is responsible for several, logically combined commands. Simply put, this button can execute not one command, but several.
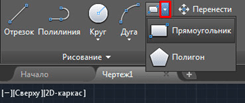
For example, clicking on the triangle / arrow next to the button with the “Rectangle” construction command opens access to the “Polygon” construction button, or, as it is now called in AutoCAD, “Polygon”.
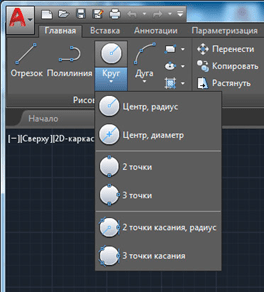
The number of additional command buttons can be small (two/three new commands). Or, as in the case of the "Circle" team, a rather impressive list of new teams will open before you.

The same small triangle / arrow that we met earlier on the quick access panel. To open the panel adaptation menu, it is also found near the names of the command areas.
Clicking on it will open access to additional buttons, the commands of which are used less often than those that are always present in the area.
Yes, I would like to point out the fact that not all commands are present on the command ribbons and panels. Some commands can be run from the command line, but we'll talk about that later.
And so, we remind you that we are considering the “AutoCAD Program Interface” using the example of version 2018. Having studied the main elements of the upper part of the program window, we move on to the main workspace of the AutoCAD program.
The workspace starts right after the command ribbon. It is titled by labels or tabs of open files. They are highlighted with an orange rectangle in our figure.
How many files can be used in AutoCAD at the same time?
AutoCAD can work with several files at the same time. And instead of the tabs "Drawing1", "Drawing2" you will have the names of these files.
The working field is represented by " endless space” or “model space” divided into cells. It is here, in model space, that we will create 2D primitives, circles and rectangles. Use the "Polyline" tool and, by editing all this - get the finished drawing!
In the upper right corner of the working field there is a "compass". Or it is also called "species cube". It is circled in purple.
His job is to help us. Navigate in model space, since in AutoCAD you can not only create 2D elements, but also model in 3D, but first things first.
Also, below the view cube, there is an additional panel that allows you to control the view of the workspace.
At the bottom of the window, there is one of the most important interface elements - "Command line" or "Command line".
She's highlighted yellow rectangle in our drawing. Here you can "manually", using the keyboard, give AutoCAD commands to perform various actions, whether it be creating elements or editing them, and indeed, system commands.
Also, yellow the rectangle marks the tabs for switching between "model space" and "paper space".
We will cover them in our next articles. As well as the panel highlighted in red, where there are buttons to enable or disable additional modeling modes.
This concludes our article. We examined the interface of the AutoCAD program, got acquainted with the basic concepts of the program window.
And now we already know where and what to “press”! Now you can try to click the mouse yourself by choosing various commands for building elements.
And in the next article, we will take a closer look at the commands for creating 2D drawing elements.