Very often, users are faced with a situation where they need to calculate the path distance. However, how and with what help to do it? The first thing that comes to mind is a navigator that can determine the distance. However, the problem is that the navigator only works with the road, and if you are, for example, in a park and want to know how many kilometers you need to go through desert areas, such a “solution” to the problem will not solve it at all.
However, we would not write an article if we did not have an ace up our sleeve: we are talking about Maps. The application is updated every day and supplemented with new chips, we cannot say exactly when the ability to determine the distance appeared, but this is probably one of the most useful functions.
In order to find out the distance traveled or planned path, you need:


As you progress, the distance displayed in the lower left corner will increase. In order to delete the last point, you need to click on the back button, which is located in the upper right corner next to the "Menu" button. By the way, by clicking on the three menu points, you can completely clear the entire route.
Thus, we have learned to determine the distance of the route of interest.
It is worth noting the generally stable and high-quality work of Google Maps. There are many similar applications in the Play Store, including MAPS.ME, Yandex.Maps, however, for some reason, it is the solution from Google, firstly, that fits best externally into the system, introducing its Material-chips, and secondly, it is programmatically implemented on high enough level. Here you can view the street using the StreetView panorama, download offline navigation, and so on. In a word, if you are interested in maps, feel free to download the official Google solution.
Many Google Maps users are wondering how to measure distance on Google maps. Such an opportunity, in theory, should exist, but not everyone can find it. Moreover, on the Internet you can find opinions that it is not in Google maps at all.
In fact, this is not true and there is such a possibility. Moreover, everything in this service is done very conveniently. You just need to know where to find and how to use Google Maps to measure distance. Let's analyze the whole process step by step.
On the computer
After that, to measure the distance between two points, you need to do the following:
- In the upper left corner there is a field where you can enter the address to search for it on the map. Next to this field there is an icon of a magnifying glass - this is the button to start the search, and after them there is an icon of an angled arrow to the right ("How to get there"). Click on this icon.

- Now enter the start and end points of the route. There is a special field for this (it is highlighted in purple in Figure 2). There you can manually enter the address.
You can also choose one of the options that are a little lower - "My location", the address of the house, work, or other addresses that the user has searched for before.
You can also put a mark directly on the map. To do this, you need to click on the icon of the starting point with the left mouse button once (in Figure No. 2 they are highlighted in red - it is a circle), and then in the same way, with the left mouse button, click on the desired place on the map.
Let's use the My Location option as an example.

- To select an end point, you need to do exactly the same actions as in the second paragraph of this list, but with the second field (highlighted in lilac in Figure No. 3). For example, let's put some point on the map manually (click on the icon of the point on the map - highlighted in red and click on some place on the map). As a result, we get the route shown in Figure 3.

- After that, a little below the panel with the start and end points, the distance will be shown (highlighted in green in Figure 3). It also shows the time it takes to travel along this route. Initially, this time is shown on the condition that you will be driving a car. This can be changed using the corresponding icons on the top panel (highlighted in black). There you can choose from options such as cycling, bus, hiking or traveling by plane.
This route can be slightly modified. For example, you can add some more point. To do this, click on the plus icon and add another point in the same way.
These points can then be swapped. To do this, simply click on them with the left mouse button and drag the cursor up or down.

Another interesting nuance is that, as you can see in the pictures above, there are points on the route white color. They can be moved as the user wants, thereby constantly changing the route.
The distance will always be shown in the same place.
On smartphone and tablet
Any smartphone or tablet has exactly the same panels. All operations are performed in the same way as shown above, only these panels are arranged in a slightly different order. It will be easy to understand.
The same operation can be performed using the Google Earth program. More details in the video below.
Very often it is required to determine the distances to various objects on the ground (range to the target). Most accurately and quickly, distances (ranges) are determined by means of special instruments (rangefinders) and rangefinding scales of binoculars, stereotubes, and sights. But due to the lack of instruments, distances are often determined using improvised means and by eye.
Among the most accurate methods for determining the range (distances) to objects on the ground are the following: by the angular dimensions of the object and by the linear dimensions of the objects.
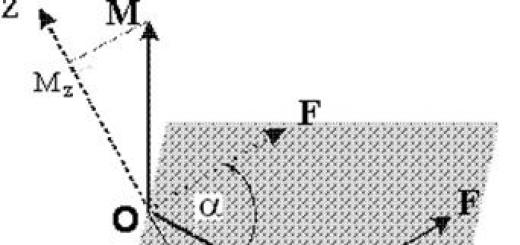
Determining the range to the target by angular dimensions objects (Fig. 2) is based on the relationship between angular and linear values. The angular dimensions of objects are measured in thousandths using binoculars, observation and aiming devices, rulers, etc.
Some angular values (in thousandths of a distance) are given in Table 1.
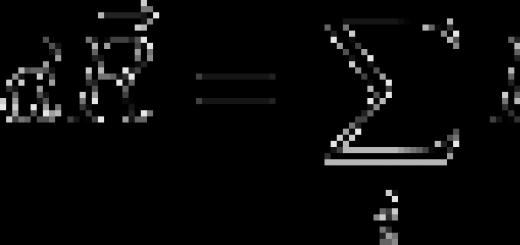
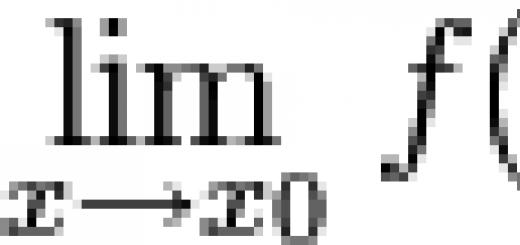
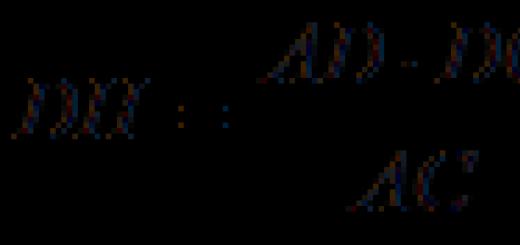
The distance to objects in meters is determined by the formula: , where B is the height (width) of the object in meters; Y is the angular magnitude of the object in thousandths.
For example (see Fig. 2):
 Rice. 2. Determining the distance to the target by the angular dimensions of the object (object)
 Table 1
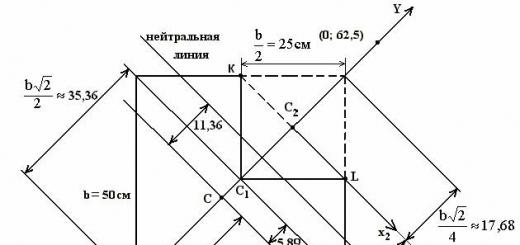
Determining the range to the target by the linear dimensions of objects is as follows (Fig. 3). Using a ruler located at a distance of 50 cm from the eye, measure the height (width) of the observed object in millimeters. Then the actual height (width) of the object in centimeters is divided by the one measured by the ruler in millimeters, the result is multiplied by a constant number 5 and the required height of the object is obtained in meters. subject)" width="642" height="135"> Рис. 3. Определение дальности до цели по линейным размерам объекта (предмета) !}
For example, the distance between telegraph poles equal to 50 m (Fig. 8) is closed on the ruler with a segment of 10 mm. Therefore, the distance to the telegraph line is: ![]()
The accuracy of determining distances by angular and linear values is 5-10% of the length of the measured distance. To determine the distances by the angular and linear dimensions of objects, it is recommended to remember the values \u200b\u200b(width, height, length) of some of them, given in Table. 2.
table 2
Read full synopsisSituations may arise when you find yourself in an unknown area and cannot properly orient yourself. This often happens when you have only an insufficiently detailed tourist map with a conditional reference to coordinates (± kilometer) or none at all.
In this case, you will be helped by travel developments in determining distances, based on many years of traveler experience, which will help you really survive in extreme conditions.
During the daytime:
1. Visibility locality in open areas - 10-12 km;
2. Multi-storey buildings - 8-10 km;
3. Separate private (one-story) houses - 5-6 km;
4. Visibility of windows in houses - 4 km;
5. The visibility of the pipes on the roofs - 3 km;
6. Individual trees - from 2 km;
7. Movement of people (in the form of points) - from 1.5 to 2 km;
8. Hands and feet of people (in motion) - 700 m;
9. Bindings in window frames - 500 m;
10. Human head - from 400 m;
11. Parts of clothing and their color - from 250 to 300 m;
12. Foliage on trees - 200m;
13. Hands and facial features - 100 m;
14. Eyes on the face (in the form of points) - from 60 to 80 m.
At night time:
1. Burning fire (small) - 6-8 km;
2. The light of a flashlight (with an incandescent bulb) - 1.5-2 km;
3. Burning match - from 1 to 1.5 km;
4. Fire of a cigarette - from 400 to 500 m.
Psychological adjustments
There are some psychological adjustments that should be taken into account when determining the distance:
1. The farther away an object is, the narrower and lower it will appear. It is for this reason that such large landscape objects as mountains seem closer than they actually are. Also, lying objects always seem longer than standing upright.
2. On a flat surface (water, snow, flat field), the distance seems to be less than it really is. So the width of the river, from a gently sloping bank, will be visually larger than from a steep one.
3. When viewed from the bottom up, the slope will appear less steep. In this case, the distances to objects look less than the actual ones.
4. Any light at night seems noticeably closer than in reality. Just like during the day, bright objects seem closer.
5. When looking at a slope, a bare slope will appear steeper than a vegetated slope.
6. Traveled road seems shorter. A road on a plain is visually larger than a road on rough terrain.
Determining the distance to an object using the detailed triangles method
With some knowledge
The method is based on the mathematical aspect ratio of triangles combined with the knowledge of two quantities:
1. The length of the thumb is approximately 60 mm. It is more convenient to use an ordinary match, the length of which is 45 mm.
2. The distance from the eyes to the thumb of the outstretched hand is approximately 60 cm, although for accurate results it is better to measure your own parameters.
To accurately determine the distance to an object, you need to know its dimensions or height.
So, when determining the distance to the village, it must be taken into account that the average height of the walls of private buildings is about 3 meters. The same height is at the roof of the building. From this it follows that the height of the house is ± 6 m.
To determine the distance, stretching your hand forward, put your thumb up in order to assess how long the building “fits” into the finger.
Example1
For example, let's imagine that the house fits into 1/3 of the length, that is, 2 cm.
In such triangles, the height is related to the required distance, as the “projection” of the height is related to the distance of the projection from the viewpoint (and vice versa). Making measurements:
6 m height (building) / X m (eye-finger distance) = 2 cm / 60 cm or
X m / 6 = 60/2
Where X \u003d 6 × 30 \u003d 180 m
Now, knowing the height of the object and having a ruler at our disposal, we can calculate distances with sufficient accuracy.
Example2
The telegraph pole has a height of 6m.
Using a match we get:


Without knowing the quantities
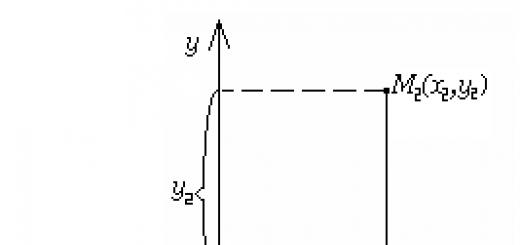
If the height of the objects is unknown to you, you will have to make two preliminary measurements of the projection of the height of the object under study from two different points. To do this, after the first measurement, you need to approach this object at some distance, designating it L, and the first and second projections, respectively, h1 and h2.
Let's apply the formula:
X \u003d (L × h1) / (h2-h1)
while h2 will increase when approaching the object.
Having calculated the distance to the object, it is easy to determine its height using the formula:
Dimensions used to determine distances
1. Bicycle wheel - 0.75 m;
2. Human height - approximately 1.7 m;
3. Pillar of communication lines (wooden) - 5-7 m;
4. One-story house with a roof - 6-8 m;
5. Forest of middle age - 18-20 m;
6. The length of the car - 4-4.5 m;
7. Truck length - 5-6 m;
8. Railway passenger car - 24-25 m;
9. Distance between communication poles - 50-60 m;
Marching standards:
1. The distance between the ends of the spaced little finger and thumb is 18-22 cm;
2. The distance between the ends of the spaced index and thumb is 16-18 cm;
3. The distance between the ends of the spaced index and middle fingers is 8-10 cm
4. The length of the index finger (from the base of the thumb) - 11-13 cm;
5. The length of the index finger (from the base of the middle one) - 7-8 cm;
6. The distance from the raised thumb of the outstretched hand to the eyes is 60-70 cm;
7. The width of the index finger is 2 cm;
8. Width of the nail of the index finger - 1 cm;
9. The width of the four fingers of the palm is 7-8 cm.
Determination of distance by sound
It must be remembered that the correct determination of the sound propagation distance depends on factors such as air density and humidity. As pressure and humidity increase, the range of hearing increases.
I give data corresponding to normal air humidity and a relatively quiet area:
1. Noise of a passing train - 5-10 km;
2. A shot from a hunting rifle - 2-4 km;
3. Car signal, tractor crackling at start-up, loud whistle - 2-3 km;
4. Dog barking - 1-2 km;
5. Car traffic on the highway - 1-2 km;
6. Creek (illegible) - 1-1.5 km;
7. The sound of a revving passenger car - 0.5 -1 km;
8. Crack and noise of a falling tree - 800m-1 km;
9. Knock of an ax, squeal of a saw, knock on metal - 300-500m;
10. Conversation of people (calm) - 200m;
11. Cough and soft speech - 50-100m;
Transfer yourself a similar tablet to a notepad, it will come in handy:
| Sound sources |
start distanceaudibility (average) |
| Noise of a passing train | 5-10 km |
| The sound of a shot from a hunting rifle | 2-4 km |
| Tractor engine noise, car horns | 2-3 km |
| Highway traffic | 1-2 km |
| Horse neighing, dogs barking | 1-2 km |
| Loud unintelligible scream | 1-1.5 km |
| Movement of cars on a dirt road | 500m-1 km |
| Falling (crackling) of a felled tree | 800m |
| The squeal of a saw, the clatter of an ax, the clatter of a bowler hat | 300-500m |
| Conversation (indistinct) of people | 200m |
| Cough, soft speech | 50-100m |
We often hear that shooters simply do not know how to determine the distance to the target (target) at which they need to shoot. And this despite the fact that on a rifle, or a gun (carbine) an optical sight is installed. In general, the topic of optical sights is very common in questions on forums and letters from readers. The main issues are aiming reticles and distances to the object of observation. Which reticle is best for long range shooting. Why big ones? Yes, because at a distance of 10 to 20 m it is easier to use a collimator sight. I decided to streamline some information about optics and distance.
A simple method for determining the distance to an object
In the picture below you can see the reticle Rangefinder, or as it is popularly called - "crossbow net". Sights with this type of reticle have gained great popularity among owners of weapons with optical sights. A convenient scale for calculating distances and at the same time auxiliary crosshairs allow you to very accurately calculate the distance to the target, making certain adjustments. The figure clearly shows how you can determine the distance to the target using the example of a 4x32 optical sight.

Visual determination of the distance to the target using an optical sight
(Rangefinder reticle, or crossbow reticle)
|
|
It should be noted that the adjustment and preliminary calibration of each sight must be carried out separately. You need to do this as follows:
- take a "standard" with a vertical and horizontal size of 50 cm (for example, a cardboard box),
- set the magnification of the sight to 4 (if you have a sight with a variable magnification) and look at the "reference" through the optical sight from a distance of 30 m. Usually at this distance, 0.5 meters wide is placed between the curves at the level of the central crosshair.
If the "reference" does not fit between the curves, or vice versa is much smaller, then you need to change the distance to the target until you achieve the desired result. Remember this distance, or better yet, make a note to yourself so that later, when you need it, you can quickly calculate the distance to the target.
In the same way, we find the distances corresponding to all other aiming marks on the grid. After that, you can already start to shoot the sight. "Why not the other way around?" - you ask. Yes, because it is easier to shoot the sight at already known distances. Now, having looked at the object of hunting through an optical sight, you will definitely know the distance to the target.
Such sights can be installed on pneumatic and firearms.
For an approximate determination of the distance, a sniper or shooter can use the following, also the simplest methods.
Eye method for determining the distance to the target
To hit the target with the first shot, you need to know the distance to it. This is necessary to correctly determine the amount of corrections for crosswind, air temperature, Atmosphere pressure and, most importantly, to set the correct sight and select the aiming point.
The ability to quickly and accurately determine the distance to stationary, moving, and also to emerging targets is one of the main conditions successful work sniper. 
Rice. Proportional perception of the target by the PSO-1 reticle for the development of automatic skills in determining the range
The main, simplest and fastest, the most accessible to a sniper in any combat situation. However, a sufficiently accurate eye is not acquired immediately, it is developed through systematic training carried out in a variety of terrain conditions, at different times of the year and day. In order to develop your eye, it is necessary to practice more often in assessing distances by eye with the obligatory verification of their steps and on the map or in some other way.
First of all, it is necessary to learn to mentally represent and confidently distinguish on any terrain a few of the most convenient distances as standards. You should start training with short distances(10, 50, 100 m). Having mastered these distances well, you can move successively to large ones (200, 400, 800 m) up to the maximum range of the actual fire of a sniper rifle. Having studied and fixed these standards in visual memory, one can easily compare with them and evaluate other distances.
In the process of such training, the main attention should be paid to taking into account side effects that affect the accuracy. eye method distance definitions:
1. Larger objects appear closer than smaller ones at the same distance.
2. Objects that appear sharper and more distinct seem to be closer, therefore:
- objects of bright color (white, yellow, red) seem closer than objects of dark colors (black, brown, blue),
- brightly lit objects appear closer than dimly lit objects that are at the same distance,
- during fog, rain, at dusk, on cloudy days, when the air is saturated with dust, the observed objects seem further than on clear sunny days,
- the sharper the difference in the color of objects and the background on which they are visible, the more reduced the distances to these objects seem; for example, in winter, a snowy field, as it were, brings all the darker objects on it closer.
3. The fewer intermediate objects are between the eye and the observed object, the closer this object seems, in particular:
- objects on flat terrain appear closer,
- distances defined through vast open water spaces seem especially shortened, the opposite shore always seems closer than in reality,
- terrain folds (ravines, hollows) crossing the measured line, as it were, reduce the distance,
When observing lying down, objects appear closer than when observing standing up.
4. When viewed from the bottom up, from the bottom of the mountain to the top, objects seem closer, and when viewed from the top down - farther.
Visibility of objects at different distances:
| Distance (km) | Thing |
| 0,1 | Human facial features, hands, details of equipment and weapons. Collapsed plaster, architectural decorations, individual building bricks. The shape and color of the leaves, the bark of tree trunks. Threads wire fence and personal weapons: pistol, rocket launcher. |
| 0,2 | General features of the face, general details of equipment and weapons, the shape of the headgear. Separate logs and boards, broken windows of buildings. Tree leaves and wire on wire fence posts. At night, lit cigarettes. |
| 0,3 | The oval of a person's face, the colors of clothes. Details of buildings: cornices, architraves, drainpipes. Light infantry weapons: rifle, machine gun, light machine gun. |
| 0,4 | Headwear, clothes, shoes. Living figure in general terms. Bindings of frames in the windows of buildings. Heavy infantry weapons: AGS, mortar, heavy machine gun. |
| 0,5-0,6 | The contours of a living figure are clear, the movements of arms and legs are distinguishable. Large building details: porch, fence, windows, doors. Bough of trees. Wire fence supports. Light artillery: LNG, memory, BO, heavy mortar. |
| 0,7-0,8 | A living figure is a general outline. Chimneys and attic windows of buildings are distinguishable. Large branches of trees. Trucks, combat vehicles and tanks standing still. |
| 0,9-1,0 | The outlines of a living figure are difficult to distinguish. Stains on building windows. The lower part of the trunk and the general contour of the trees. Telegraph poles. |
| 2,0-4,0 | Small detached houses, railway wagons. At night, lit lanterns. |
| 6,0-8,0 | Factory chimneys, clusters of small houses, large detached buildings. At night, headlights are on. |
| 15,0-18,0 | Big bell towers and big towers. |
Determining the distance to the target by angular dimensions
Determining the distance to the target by angular dimensions is possible if the observed linear value (height, width or length) of the object to which the distance is determined is known. The method is reduced to measuring the angle in thousandths under which this object is visible.
The thousandth is 1/6000 of the circular horizon, increasing in width in direct proportion to the increase in distance to the reference point, which is the center of the circle. For those who find it difficult to understand, remember that the thousandth is in the distance:
100 m = 10 cm,
200 m = 20 cm,
300 m = 30 cm,
400 m = 40 cm etc.
Knowing the approximate linear dimensions of the target or landmark in meters and the angular value of this object, you can determine the distance using the thousandth formula: D \u003d (B x 1000) / Y,
where D- distance to target
1000
- a constant unchanging mathematical value that is always present in this formula
At- the angular value of the target, that is, to put it simply, how many one-thousand divisions on the scale of an optical sight or other device will take the target
AT is the metric (i.e. in meters) known width or height of the target.
For example, a target is spotted. It is necessary to determine the distance to it. What are the actions?
1. We measure the angle of the target in thousand
2. The size of the object located near the target in meters, multiply by 1000
3. Divide the result by the measured angle in thousand
The metric parameters of some objects are:
| An object | Height (m) | Width (m) |
| 0,25 | 0,20 | |
| 0,25 | 0,25 | |
| Man | 1,7-1,8 | 0,5 |
| ducked man | 1,5 | 0,5 |
| Motorcyclist | 1,7 | 0,6 |
| Passenger car | 1,5 | 3,8-4,5 |
| cargo vehicle | 2,0-3,0 | 5,0-6,0 |
| Railway car on 4 axles | 3,5-4,0 | 14,0-15,0 |
| wooden pole | 6,0 | - |
| concrete pillar | 8,0 | - |
| Cottage | 5,0 | - |
| One floor of a multi-storey building | 3,0 | - |
| factory pipe | 30,0 | - |
The scales of open sights, optical sights and optical instruments in service are graduated in thousandths and have a division value: 

Thus, to determine the distance to an object using optics, it is necessary to place it between the scale divisions of the sight (instrument) and, having learned its angular value, calculate the distance using the above formula.
![]() Example, you need to determine the distance to the target (chest or growth target), which fits in one small side segment of the scale of the PSO-1 optical sight.
Example, you need to determine the distance to the target (chest or growth target), which fits in one small side segment of the scale of the PSO-1 optical sight.
Decision, the width of the chest or growth target (infantryman in full height) is equal to 0.5 m. 1 thousandth angle.
Hence: D \u003d (0.5 x 1000) / 1 \u003d 500m.
Measuring angles with improvised means
To measure angles with a ruler, you must hold it in front of you, at a distance of 50 cm from the eye, then one of its divisions (1 mm) will correspond to 0-02.
The accuracy of measuring angles in this way depends on the skill in making the ruler exactly 50 cm from the eye. This can be practiced with a rope (thread) of this length.
To measure angles with improvised objects, you can use a finger, palm, or any small improvised object (matchbox, pencil, 7.62 mm sniper cartridge), the dimensions of which are known in millimeters, and therefore in thousandths. To measure the angle, such a measure is also taken at a distance of 50 cm from the eye, and the desired value of the angle is determined from it by comparison.
The angular values of some objects are:

Having acquired skills in measuring angles, one should proceed directly to determining distances from the measured angular dimensions of objects.
Determination of distances by the angular dimensions of objects gives accurate results only if the actual dimensions of the observed objects are well known, and angular measurements are made carefully using measuring instruments(binoculars, stereo tubes).