We are pleased to invite you to AutoCad courses (AutoCAD). Our offer is relevant for those who plan to become a sought-after specialist, having mastered an interesting direction. You can always choose a program that meets all your wishes and skills.
Why take AutoCad training?
Computer-aided design systems are becoming more and more popular. They are used by designers, planners, engineers, artists. Modern programs allow you to reduce the time spent on performing the usual actions and improve the results of work.
Want to expand your options? Come to us!
1. AutoCad courses for beginners (from scratch) in Moscow, which are held at a low price, will be of interest to those who are taking their first steps in the profession.
2. Professional development is relevant for specialists who plan to expand their capabilities.
3. Advanced courses AutoCad (AutoCAD) + 3D attract those who are constantly improving and actively mastering three-dimensional modeling.
Training will allow:
Expand opportunities.
to save time,
get all the necessary skills and knowledge, increase income by getting a new position or starting your own business.
Why is it interesting and profitable to take AutoCad courses with us?
1. Autocad training (AutoCAD) is carried out using actual programs. Classes are built on the basis of popular areas.
2. Courses are taught by experienced teachers who are practicing professionals. They are able to interestingly present any material and reveal all the subtleties of the activity. From our teachers you will learn the professional secrets of craftsmanship and the real secrets of computer-aided design, which are not written about in standard manuals.
3. AutoCad training for beginners from scratch in Moscow is carried out at a bargain price. You do not overpay for classes, but you get the result you expect.
4. We provide training as soon as possible. You can attend classes without interrupting your main activity.
Come! We will name the exact prices for learning AutoCad for beginners from scratch in Moscow, we will tell you about all its features. You can easily choose an interesting program and start classes in the near future.
So, ? Have you read this sentence? Fine! So it's time for us to say hello! Good day! We are very pleased to welcome you to our website. A separate section of which is devoted to one of the most popular programs in the construction industry around the world. In Russia, including from Autodesk.
Written about this software great amount articles/notes/textbooks and other literature. Our site will not be the first to teach you how to get started with AutoCAD.
Our articles and training materials are compiled in such a way that the final result, aimed at mastering all the necessary functions of AutoCAD CAD system, is achieved in the shortest possible time.
With an efficient implementation system theoretical knowledge in practical significance for each of you.
And most importantly - training on our website is absolutely FREE!
There are always people who ask: "?". Or they don't know how to ask and where to start.
So it's time to start our work. As we promised, there will not be a lot of unnecessary chatter and abstruse phrases from textbooks or other literature. Only Q&A. And anticipating your first question: Where to get Autocad?”, - we answer: “Go to the site https://www.autodesk.ru” and register there to get a full-featured version of AutoCAD for educational purposes absolutely free.
If you have any problems with registering or installing the program, be sure to read our article "Registration on the Autodesk Education Community website" and "". In the meantime, we believe that you have AutoCAD version 2018 or lower installed on your computer. But not lower than 2013.
How to get started in AutoCAD? Begin!
And so, we are looking for a shortcut on the desktop to launch it and run it!
A rather complex and powerful program, but despite this, it can work on not quite new computers. However, this depends on the complexity and size of the files you are working with.
In other words, if you have a large complex drawing, then it will require more computing power from the computer.

But launching a program is always a slow process. So be prepared to wait a bit.

You can speed up the launch of AutoCAD by installing the program on a modern high-speed solid-state SSD drive.

After starting the program, you will see the program window:

We have specially highlighted the most significant elements of the interface of the AutoCAD window with different colors. And now let's talk about each of them. Top/down, left/right and in order! J Let's go!
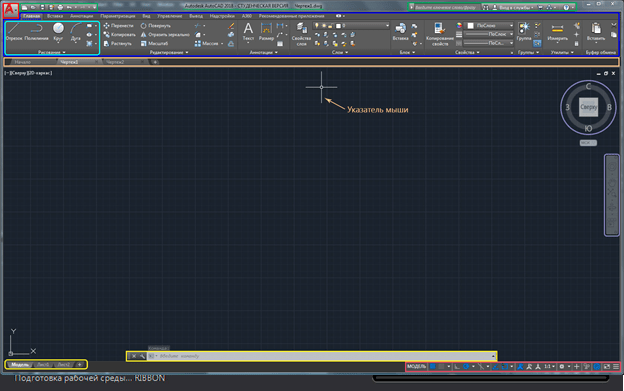
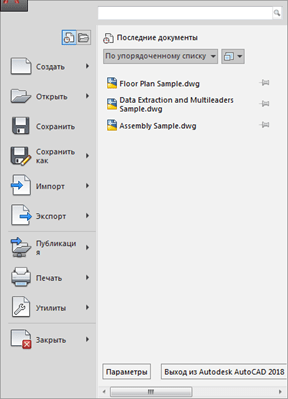
The button for calling the main menu of the program is surrounded by a red rectangle, with the help of which you can "Create a file", Open an existing one, Save, Print or Export a drawing file to another format.
For example, in PDF format, for viewing on a computer where AutoCAD is not installed. Or for demonstration to the customer. There is also a list of the latest files you have worked with for quick and easy opening.
Highlighted in green is the "Quick Access Toolbar", which contains commands from the "Main Menu", as well as other useful commands.
The contents of the panel can be customized by clicking on the button with a small triangle at the end of the panel, pointing down.
The panel adaptation menu will open and by checking or unchecking the necessary checkboxes, we add or remove command buttons from the panel.

The name of the program, license type and file name are displayed in the center of the title bar of the window. "Drawing 1.dwg" is the "default" name of the AutoCAD file and will change when we save the file under our own name. ".dwg" is an AutoCAD file extension. Because of this abbreviation, Russian-speaking users also call AutoCAD files “devageshki”.
On the right side of the title window is the "Cloud Menu" which allows you to access background information and cloud services from Autodesk.
Below, in blue, "Team Ribbon" is highlighted. AutoCAD, like many programs, has a modern "ribbon interface" that allows you to optimize the window's workspace.
Giving the user access to the necessary commands in the minimum number of mouse clicks.
The name of the "active" ribbon of commands in the figure is underlined with a blue dotted line "Main". Clicking on other tabs activates the transition to them.
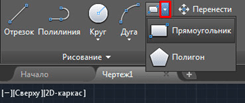
Each team ribbon is divided into "Areas". For example, in the figure blue the area of commands "Drawing" is highlighted in color.
The names of the areas were not chosen randomly. They tell the user which buttons of which commands are collected on this area.
For example, the buttons in the "Drawing" command area are responsible for creating 2D primitives and other elements (circle, rectangle, arc...).
Button interface element
Separately, I would like to note the interface element of the command buttons, which is found on different areas different buttons have a “small triangle” pointing downwards.
It tells us that this button is responsible for several, logically combined commands. Simply put, this button can execute not one command, but several.
For example, clicking on the triangle / arrow next to the button with the “Rectangle” construction command opens access to the “Polygon” construction button, or, as it is now called in AutoCAD, “Polygon”.
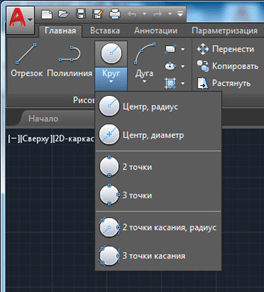
The number of additional command buttons can be small (two/three new commands). Or, as in the case of the "Circle" team, a rather impressive list of new teams will open before you.

The same small triangle / arrow that we met earlier on the quick access panel. To open the panel adaptation menu, it is also found near the names of the command areas.
Clicking on it will open access to additional buttons, the commands of which are used less often than those that are always present in the area.
Yes, I would like to point out the fact that not all commands are present on the command ribbons and panels. Some commands can be run from the command line, but we'll talk about that later.
And so, we remind you that we are considering the “AutoCAD Program Interface” using the example of version 2018. Having studied the main elements of the upper part of the program window, we move on to the main workspace of the AutoCAD program.
The workspace starts right after the command ribbon. It is titled by labels or tabs of open files. They are highlighted with an orange rectangle in our figure.
How many files can be used in AutoCAD at the same time?
AutoCAD can work with several files at the same time. And instead of the tabs "Drawing1", "Drawing2" you will have the names of these files.
The working field is represented by " endless space” or “model space” divided into cells. It is here, in model space, that we will create 2D primitives, circles and rectangles. Use the "Polyline" tool and, by editing all this - get the finished drawing!
In the upper right corner of the working field there is a "compass". Or it is also called "species cube". It is circled in purple.
His job is to help us. Navigate in model space, since in AutoCAD you can not only create 2D elements, but also model in 3D, but first things first.
Also, below the view cube, there is an additional panel that allows you to control the view of the workspace.
At the bottom of the window, there is one of the most important interface elements - "Command line" or "Command line".
She's highlighted yellow rectangle in our drawing. Here you can "manually", using the keyboard, give AutoCAD commands to perform various actions, whether it be creating elements or editing them, and indeed, system commands.
Also, yellow the rectangle marks the tabs for switching between "model space" and "paper space".
We will cover them in our next articles. As well as the panel highlighted in red, where there are buttons to enable or disable additional modeling modes.
This concludes our article. We examined the interface of the AutoCAD program, got acquainted with the basic concepts of the program window.
And now we already know where and what to “press”! Now you can try to click the mouse yourself by choosing various commands for building elements.
And in the next article, we will take a closer look at the commands for creating 2D drawing elements.
AutoCAD courses (AutoCAD) "GTsDPO" in Moscow - training in a universal software package for automated 2D and 3D design tools.
Classes are held in an interactive format. Teachers promptly give answers to emerging questions, help with difficulties that arise when completing assignments. By moving away from traditional lectures and focusing on the development of practical skills, educational material easily digested by students with no experience with Autodesk software products.
Course objective:
- maximize the basic capabilities of the system for building technically competent and accurate drawing documentation - AutoCAD;
- to teach how to create, edit and print drawings of various levels of complexity and orientation.
Who are the AutoCAD beginner courses aimed at?
First of all, knowledge of the AutoCAD program is necessary:
- students technical universities;
- designers;
- architects;
- designers-designers;
- builders;
- specialists who solve substantive problems in the field of land use and land management.
Autocad as the main stage of the global design process
Why the autocad program is so popular, and the specialists of this technological platform are in great demand. Because autocad is the beginning of any global design process in construction, engineering, design. Therefore, according to statistics, those who want to study autocad 2018, the most a large number of. Various architectural bureaus, design studios, design organizations and those who just want to fill the classrooms of the training center every day. But that's not all, the dynamics is such that there are more and more people who want to be trained in AutoCAD from scratch. Obviously, this is due to the fact that the pace of construction in the country is becoming gigantic, and the requirements for technical and technological design standards are constantly increasing. Architectural structures are becoming more and more complex forms. And as you know, autocad allows you to adhere to the most modern design standards. There are more and more professions that require the ability to work in autocad, and their popularity is constantly growing. If you are a novice specialist in the field of construction or design, then the sooner you complete the autocad training for beginners, the faster you can find a prestigious job and join the team. For training in AutoCAD, the courses attract the most experienced teachers - practitioners who are able to reveal the topic of any lesson in the most accessible form.
What can you learn in AutoCAD courses?
- confidently work with interface tools;
- form, modify and edit two-dimensional objects;
- prepare and print drawings;
- perform the construction and modification of 3D objects.
How the learning process of Autocad is built
Firstly, autocad training courses are divided into several levels according to their complexity. At the first level, the basic capabilities of the program, 2D flat drawing and drawing design, are mastered, at the second level, 3D modeling tools are considered. Secondly, autocad computer courses pay special attention to practical application programs. As part of the course, several projects of different complexity are created, where the use of basic drawing tools or the creation of three-dimensional objects is considered. All projects are accompanied by teachers individually considering each. Thirdly, autocad training courses in Moscow, upon completion of the training process, provide an opportunity for students to contact The educational center for counseling or additional training, i.e. support is provided to students, both at the stage of training and after completion. It is worth noting that the learning process becomes effective when the student practices independently, doing homework or implementing his own project. autocad program requires constant practice.
Requirements for initial training:
- The program of this AutoCAD training course is designed for students who are confident in working with a PC.
Prospects for further employment:
If you have a specialized education, having mastered the curriculum of the course of computer design in AutoCAD training(AutoCAD), you can successfully apply for employment:
- in design and construction organizations;
- in design bureaus;
- in design studios.
Graduates who want to expand their knowledge base have the opportunity to continue their education by choosing the right direction among the computer courses of the GCCPE.
Course Curriculum
- Program interface. Opening a document. Screen areas. Setting. Types of mouse pointer.
- World and user coordinate systems. Menus, lines and toolbars. Command line, text window, dialogue with the program.
- ZOOM tools and commands. Updating and regenerating a drawing.
- Line tool.
- Coordinate systems (absolute, relative, polar). Ways to enter coordinates.
- Finishing work and saving the drawing. File types used in AutoCAD.
Topic 2. Working with objects. Working with primitives
- Units.
- Workspace modes.
- Ways to enter commands and their completion. Command options and options for their selection. Cancel commands. Command return. Repeat the last command and previously used commands.
- Construction from the end of the segment. Selection of objects. Selection by a frame, types of a selection frame. Cancel selection.
- Remove objects, eraser.
- Construction modes: orthogonal mode, polar mode.
- Grid and binding. Permanent and one-time (temporary) object snaps. object tracking.
- Primitives in AutoCAD: point (using and changing the type of point), rectangle, circle, polygon arc, ellipse, elliptical arc, spline, construction line.
- Hatching: hatching of one, nested, several objects. Gradient fill. Hatching properties: associativity, transparency, background. Hatching editing.
- Creation of new drawings. Inserting ready-made drawings or their fragments.
Topic 3. Modification of objects
List of main questions to be studied:
- Tools of the Editing panel and their options: move, offset by a specified distance, copy, rotate, scale, mirror, array, 3D alignment, trim and extend lines, chamfer, fillet. Tools "gap", dismember ("blow up").
- Modification with handles.
Topic 4. Working with layers: creating and setting.
List of main questions to be studied:
- Working with layers: creating, editing, setting parameters, etc.
- Building axes.
- Working with objects: quick selection, changing properties, etc.
- AutoCAD Control Center (DesignCenter).
Topic 5. Working with text
List of main questions to be studied:
- Text: single line and multiline text. Text editing. Special symbols. Text scaling. Alignment. Creation proper fraction.
- Creating text styles.
- Find and replace text.
- Spell check.
- Callout. Callout style.
Topic 6. Working with dimensions
List of main questions to be studied:
- Dimensioning: simple dimensions.
- Complicated sizes. Accelerated installation. Various ways size editing. Dimension styles. Scaling objects with dimensions.
- The concept of annotative dimensions.
- Measurement tools. Methods for measuring area. Convert units of measure with a quick calculator.
Topic 7. Working with polyline and multiline
List of main questions to be studied:
- Poly lines. Poly line editing.
- Multi lines Editing multi lines.
Topic 8. Blocks
List of main questions to be studied:
- Block creation. Block insert. Insert blocks using the control center.
- Save block to file. Inserting a block from a file.
- Block editing. Block cutting.
- dynamic blocks.
- Creating a palette of tools from blocks.
- Removing unused blocks. Renaming blocks. Cleaning up a drawing using the Cleanup tool.
- Block text attributes. Editing block attributes. Extracting data from blocks with attributes.
Topic 9. Printing a document
List of main questions to be studied:
- Creation of named custom coordinate systems and techniques for working with them (on the example of a construction drawing).
- Insert drawings. Editing and cropping pictures.
- Seal. Manual setup (layout). Paper space and model space. Setting sheet parameters, creating viewports, drawing layout, scaling.
- Saving the file in PDF format. Create multi-page PDFs.
Dear users, we want to inform you that some anti-virus programs falsely work on the distribution package of the MediaGet program, considering it to be infected. This software does not contain any malware and viruses, and many of the antiviruses simply warn you that this is a Downloader. If you want to avoid such problems, just add MediaGet to the list of trusted programs in your antivirus program.
How to download
By selecting the required version of the program and clicking the link, the distribution kit of the MediaGet application will be downloaded to your computer, which will be located in the Downloads folder for your browser. Find this file and run it.


In the next window, click the "Continue" button, thereby accepting the user agreement. Next, the installation of the application takes place, which takes some time.

After installation, the application starts and automatically starts downloading the program you have chosen. You can find the downloaded files in the folder you chose to install the MediaGet application.
How to install
Unpack the downloaded archive using standard WinRar or 7-Zip programs.
If the file is in the form of an image with the extension .iso, it can be opened with free program Daemon tools lite or Nero
After extracting the installation files, find and run the program's executable file, which usually has the extension .exe
Act according to further prompts of the installer program and do not interrupt the installation process of the program in an incorrect way.
Please note that the software provided is made available solely for your personal use and information. All files available for download are free of viruses and malware.