So, ? Have you read this phrase? Great! So it's time for us to say hello! Good day! We are very pleased to welcome you to our website. A separate section of which is devoted to one of the most popular programs in the construction industry around the world. In Russia, including from Autodesk.
It is written about this software product great amount articles/notes/textbooks and other literature. Our site will not be the first to teach you how to start working in AutoCAD.
Our articles and educational materials designed in such a way that the final result, aimed at mastering all the necessary functions of the AutoCAD CAD system, is achieved in the shortest possible time.
With an effective implementation system theoretical knowledge V practical significance for each of you.
And most importantly, training on our website is absolutely FREE!
There are always people who ask: “?” Or they don’t know how to ask and where to start.
So, it's time to start our work. As we promised, there will not be a lot of unnecessary chatter and abstruse phrases from textbooks or other literature. Only "Question-Answer". And anticipating your first question: “ Where to get AutoCAD?”, - we answer: “We go to the site https://www.autodesk.ru” and register there to receive a fully functional version of AutoCAD for educational purposes absolutely free.
If you have problems registering or installing the program, be sure to read our article “Registration on the Autodesk Education Community website” and “”. In the meantime, we assume that AutoCAD version 2018 or lower is installed on your computer. But not lower than 2013.
How to start working in AutoCAD? Begin!
And so, look for a shortcut on the desktop to launch and launch it!
Quite a complex and powerful program, but despite this it can work on not entirely new computers. However, this depends on the complexity and size of the files you are working with.
In other words, if you have a large, complex drawing, it will require more processing power from your computer.
But launching a program is always a slow process. So be prepared to wait a bit.

You can speed up the startup of AutoCAD by installing the program on a modern high-speed solid-state SSD drive.

After starting the program you will see the program window:
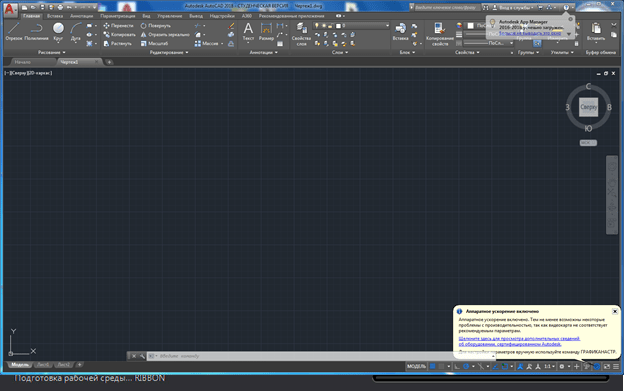
We have specially highlighted the most significant elements of the AutoCAD window interface in different colors. And now we’ll tell you about each of them. Top/down, left/right and in order! J Let's go!
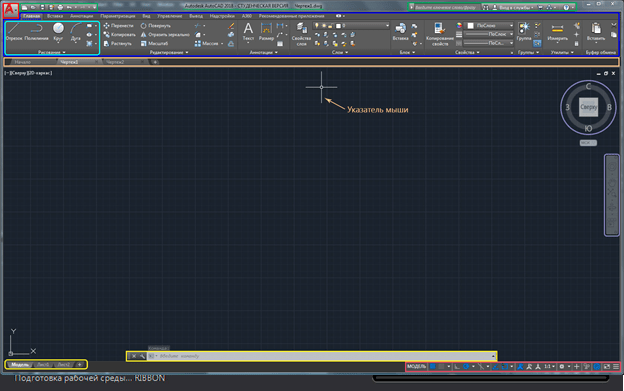
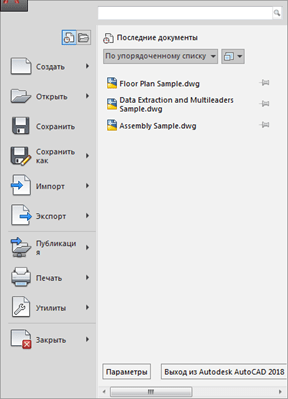
The red rectangle outlines the button for calling the main menu of the program, with which you can “Create a file”, Open an existing one, Save, Print or Export a drawing file to another format.
For example, in PDF format, for viewing on a computer where AutoCAD is not installed. Or for demonstration to the customer. There is also a list of the latest files you worked with for quick and easy opening.
Highlighted in green is the “Quick Access Toolbar”, which contains commands from the “Main Menu”, as well as other useful commands.
The contents of the panel can be customized; to do this, you need to click on the button with a small triangle at the end of the panel, pointing down.
The panel adaptation menu will open and by checking or unchecking the necessary “checkboxes” we add or remove command buttons from the panel.

The name of the program, license type and file name are displayed in the center of the title bar of the window. "Drawing 1.dwg" is the default AutoCAD file name and will change when we save the file under our own name. ".dwg" is the AutoCAD file extension. Because of this abbreviation, Russian-speaking users also call AutoCAD files “devegeshki”.
On the right side of the title window is the "Cloud Menu" which allows you to access reference information and "cloud services" of Autodesk.
Below, in blue, the “Command Tape” is highlighted. AutoCAD, like many programs, has a modern “Ribbon Interface”, which allows you to optimize the window’s workspace.
By providing the user with access to the necessary commands in a minimum number of mouse clicks.
The name of the “active” command ribbon in the figure is underlined with a blue dotted line “Home”. Clicking on other tabs will activate navigation to them.
Each command ribbon is divided into "Areas". For example, in the figure blue The “Drawing” command area is highlighted in color.
The names of the areas were not chosen by chance. They tell the user which command buttons are collected in this area.
For example, the buttons in the “Drawing” command area are responsible for creating 2D primitives and other elements (circle, rectangle, arc...).
Button UI element
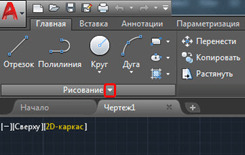
Separately, I would like to note the interface element of the command buttons, which is found on different areas for different buttons it is a “small triangle” pointing downwards.
It tells us that this button is responsible for several logically combined commands. Simply put, this button can execute not one command, but several.
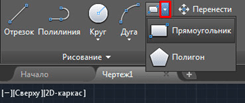
For example, clicking on the triangle/arrow next to the button with the command to construct a “Rectangle” opens access to the button for constructing a “Polygon” or, as it is now called in AutoCAD, “Polygon”.
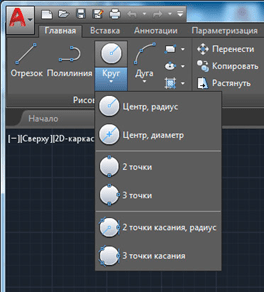
The number of additional command buttons may be small (a couple/three new commands). Or, as in the case of the “Circle” team, a rather impressive list of new teams will open before you.


The same small triangle/arrow that we saw earlier on the quick access panel. To open the panel adaptation menu, it is also found near the names of the command areas.
Clicking on it will open access to additional buttons, the commands of which are used less frequently than those that are always present in the area.
Yes, I would like to note the fact that not all commands are present on command ribbons and panels. Some commands can be run from the command line, but we'll talk about that later.
And so, we remind you that we are looking at the “Interface AutoCAD programs" using version 2018 as an example. Having studied the main elements of the upper part of the program window, we move on to the main workspace of the AutoCAD program.
The workspace begins immediately after the command ribbon. It is titled by shortcuts or tabs of open files. They are highlighted with an orange rectangle in our picture.
How many files can be used in AutoCAD at the same time?
AutoCAD can work with several files simultaneously. And instead of the tabs “Drawing1”, “Drawing2” you will have the names of these files.
The working field is represented by " infinite space"or "model space" divided into cells. It is here, in model space, that we will create 2D primitives, circles and rectangles. Use the “Polyline” tool and, by editing all this, get a finished drawing!
There is a “compass” in the upper right corner of the working field. Or it is also called a “view cube”. It is circled in purple.
His job is to help us. Find your bearings in the model space, since in AutoCAD you can not only create 2D elements, but also model in 3D, but first things first.
Also, below the view cube, there is an additional panel that allows you to control the view of the workspace.
At the bottom of the window, there is one of the most important interface elements - the “Command Line” or “Command Line”.
She's highlighted yellow rectangle in our drawing. Here you can “manually”, using the keyboard, give AutoCAD commands to perform various actions, be it creating elements or editing them, and in general, system commands.
Also, yellow The rectangle marks the tabs for switching between “model space” and “sheet space”.
We will look at them in our next articles. As well as the panel highlighted in red, where there are buttons that enable or disable additional modeling modes.
This concludes our article. We looked at the AutoCAD program interface and got acquainted with the basic concepts of the program window.
And now we already know where and what to “press”! Now you can try to click the mouse yourself, selecting various commands for constructing elements.
And in the next article we will look in detail at the commands for creating 2D drawing elements.

We are pleased to invite you to AutoCad courses. Our offer is relevant for those who plan to become a sought-after specialist by mastering an interesting field. You can always choose a program that suits all your wishes and skills.
Why take AutoCad training?
Computer-aided design systems are becoming increasingly popular. They are used by designers, planners, engineers, and artists. Modern programs allow you to reduce the time spent on performing habitual actions and improve work results.
Want to expand your options? Come to us!
1. AutoCad courses for beginners (from scratch) in Moscow, which are conducted at a low price, will be of interest to those who are taking their first steps in the profession.
2. Advanced training is relevant for specialists planning to expand their capabilities.
3. Advanced courses AutoCad (AutoCAD) + 3D attract those who are constantly improving and actively mastering three-dimensional modeling.
Training will allow:
Expand opportunities.
save time,
get all the necessary skills and knowledge, increase your income by getting a new position or starting your own business.
Why is it interesting and profitable to take AutoCad courses with us?
1. Autocad training is carried out using current programs. Classes are based on popular areas.
2. Courses are taught by experienced teachers who are practicing specialists. They are able to present any material in an interesting way and reveal all the subtleties of the activity. From our teachers you will learn professional secrets of craftsmanship and real secrets of computer-aided design, which are not written about in standard textbooks.
3. AutoCad training for beginners from scratch in Moscow is provided at a competitive price. You don’t overpay for classes, but you get the results you expect.
4. We provide training as quickly as possible. You can attend classes without interrupting your main activity.
Come! We will name the exact prices for AutoCad training for beginners from scratch in Moscow, and tell you about all its features. You can easily choose interesting program and start studying as soon as possible.
Over the three decades of its existence, AutoCAD has become the most popular tool for creating and processing two-dimensional and three-dimensional drawings on a computer. It is used in all areas where they work with drawings.
Autocad - a universal tool for an architect, engineer, builder
Autodesk AutoCAD- one of the most popular and most frequently used programs for flat 2D drawing and 3D modeling among builders, engineers and architects. Last decade proved that the popularity trend of this program will only increase, and specialists working in AutoCAD will be the most in demand and valuable. The learning trend - autocad for beginners is in the trend of all specialists in this industry. Autocad allows you to solve almost all design and modeling problems. Therefore, the autocad training program for beginners is where any civil engineer or designer should begin their journey. Starting to learn AutoCAD from scratch, everyone will learn for themselves, firstly, how to learn to draw in AutoCAD from scratch, and, secondly, how to draw up drawings in accordance with GOST. These two factors are perhaps the most valuable, since the skill of drawing and design is the most popular.
AutoCAD is most in demand in the following industries:
- Architecture and construction.
- Industrial design and interior design.
- Design bureaus.
- Telecommunications companies.
- Geodesy and cartography.
For some industries, taking into account their specifics, separate versions of the program are created. For example, AutoCAD Electrical is designed specifically for electrical designers.
How suitable is Autocad for interior designers?
Autocad is closely integrated with 3ds Max and Revit programs, which makes it possible for interior designers to use Autocad too. By quickly and conveniently creating an interior drawing in autocad, you export it to any program and continue to be creative there. This is a very important feature of the program; you often hear the question whether the AutoCAD training program is suitable for me for beginners, in almost all cases the answer is yes. The fact is that in the 3ds Max program, which is positioned as a program for designers, there are no drawing tools at all. And if we need filigree precision when carrying out an interior design project, then we cannot do without autocad. In the Revit program, which is also used by interior designers, although there are tools for creating drawings, but, as practice shows, the most convenient and optimal solution is to use Autocad drawings in Revit. Therefore, working with the autocad program for beginners is something that will suit most specialists from various fields of construction, mechanical engineering or design.
Main features and functions of the program
AutoCAD was conceived as a complete replacement for the arsenal of the draftsman and designer. A drawing board, sheets of whatman paper, pencils, rulers, protractors, erasers, compasses and other tools migrated to the computer screen. And in addition to this, the user received hundreds of other tools developed in the digital environment.
The basis of work in the program is still the same as when drawing by hand. That is, the construction of drawings of any complexity using the simplest graphic elements - segments, circles, arcs. However, in addition to this, AutoCAD functionality is complemented by more than 5,000 specialized application programs developed for various industries.
Benefits of AutoCAD before regular drawings:
- Absolute precision of all lines.
- The ability to make adjustments to the drawing of any scale and complexity.
- Unlimited workspace.
- Convenience of electronic format - a drawing can be quickly copied, a modified version can be prepared, and sent via e-mail.
- By working with layers, you can create complex drawings with overlaying objects - for example, master plans of buildings, in which various communication systems are displayed on separate layers.
- The ability to use old developments - ready-made drawings and 3D models of various standard objects.
- Automation of many operations when preparing drawings - for example, automatic sizing of segments, calculation of areas and volumes.
- Rich tools for working with three-dimensional objects - constructing isometric projections based on two-dimensional drawings, simulating illumination.
- Easy integration with other Autodesk programs - 3ds Max, Corel Draw, Archicad, Inventor, Civil 3D.
Autocad is the most popular program in the construction and mechanical engineering industries
Since autocad solves almost all problems faced by a designer on one technological platform, the demand for specialists proficient in this program is the highest. Having mastered autocad from scratch, having understood the principle of how work with the autocad program for beginners is structured, any specialist will significantly expand the scope of his professional capabilities. When starting to take the autocad course for beginners, make sure that the program is already installed on your home computer. To do this for free, visit the Autodesk Education Community website and you will be given the opportunity. How to learn to draw in AutoCAD from scratch will be shown to you not only by your course teacher, but also by the tools of the program itself, which are so intuitive that your first steps in AutoCAD will be as comfortable as possible. We are reporting this because there is a perception among some listeners that the program is overly complex. Nothing like this. Everything is available.
- Don't grab everything at once. AutoCAD has many faces, and it can take years to master all of its tools and capabilities. Therefore, at the beginning of your journey, concentrate only on universal tasks - such as creating 2D drawings, working with layers, working with ready-made templates. It makes sense to study specific tools when you know for sure that you will need them in practice.
- Don't reinvent the wheel. When preparing a complex drawing or model, you often have to use various standard elements - windows, doors, furniture, architectural elements, bearings and much more. You can not draw most of these elements yourself, but look for ready-made options on the Internet, and, if necessary, adjust them for your project.
- Customize the program for yourself. If you often have to make similar drawings or design them in the same style, create your own settings templates for this and specify the parameters you need in them. To avoid losing these templates, save them on a separate flash drive or in the cloud. Toolbars in the ribbon can also be easily dragged with the mouse and swapped around, placing those that you use most often in the most convenient places.
- Help is always nearby. In the upper left corner of the main program window there is a large button with the letter “A”. This is not just a program logo. Clicking on it will bring up the search bar. Useful when you forget the right command. Enter the name of the command in the line, and the program will give you a list of suitable options.
- Save often. This should become your habit when working in the program. Remember to press Ctrl+S every three to five minutes, or after each series of successful operations.
- Prepare drawings on sheets. AutoCAD has an unlimited working area, which is not the case with paper. But sometimes drawings need to be printed. Get used to immediately breaking down large drawings onto standard sheets - A4, A3, and so on.
How much can you earn with AutoCAD?
Poskol Because the ability to work in this program is necessary in a variety of industries and professions, the salary level for these vacancies is also very different.
A short overview (average salaries in Russia are indicated, October 2016, data - Yandex.Work):
- Project managers (construction) - 70 thousand rubles, while there are dozens of vacancies with a salary of 100-120 thousand rubles and above.
- Chief engineers of projects - 55 thousand rubles, also with the prospect of 100-120 thousand rubles.
- Architects - 54 thousand rubles.
- VET engineers, estimators - 50 thousand rubles.
- Designers - 50 thousand rubles.
- Interior designers - 42 thousand rubles.
- Technical specialists—38 thousand rubles.
- Design engineers - 34 thousand rubles.
In Moscow and St. Petersburg, the salary level for these specialties is higher. In addition, within the categories themselves, the difference in wage levels can reach 2-3 times. But in general, the trend is clear - a person with knowledge of AutoCAD can count on a fairly high salary and career growth.
Where to learn to work in AutoCAD
Autodesk has a competent marketing policy. The company cooperates with top educational institutions around the world, offering them special free versions. Therefore, if you are going to study, for example, at an architecture and construction academy or another technical university, then surely AutoCAD will be included in curriculum. Thus, the development company makes sure that representatives of technical specialties are familiar with their product from their student days.
If you have not received a profile technical education, but want to master AutoCAD, there are two more options:
1. Self-study
To do this, you can use numerous textbooks and video courses. Many of them are posted on the Internet for free.
Pros of this approach- the fact that you work at your own rhythm, at a time convenient for you, choosing the most suitable presentation of the material for you.
Minuses — not everyone has the self-discipline to study independently.
2. Specialized courses
Here, in a short time, you will receive a set of knowledge on this product, comparable to what students of specialized technical universities receive.
Advantages of full-time courses:
- The acquired knowledge is immediately consolidated with practical exercises.
- You can ask your teacher for help at any time.
- Working in a group - you can communicate and share experiences.
GCDPO is an authorized Autodesk training center, so our graduates receive international certificates, recognized not only by Russian companies, but also abroad. The AutoCAD training course consists of 9 lessons with a total duration of 36 academic hours. The program is designed for users starting to master AutoCAD from scratch.
So, ? Have you read this phrase? Great! So it's time for us to say hello! Good day! We are very pleased to welcome you to our website. A separate section of which is devoted to one of the most popular programs in the construction industry around the world. In Russia, including from Autodesk.
A huge number of articles/notes/textbooks and other literature have been written about this software product. Our site will not be the first to teach you how to start working in AutoCAD.
Our articles and training materials are compiled in such a way that the final result, aimed at mastering all the necessary functions of the AutoCAD CAD system, is achieved in the shortest possible time.
With an effective system for introducing theoretical knowledge into practical significance for each of you.
And most importantly, training on our website is absolutely FREE!
There are always people who ask: “?” Or they don’t know how to ask and where to start.
So, it's time to start our work. As we promised, there will not be a lot of unnecessary chatter and abstruse phrases from textbooks or other literature. Only "Question-Answer". And anticipating your first question: “ Where to get AutoCAD?”, - we answer: “We go to the site https://www.autodesk.ru” and register there to receive a fully functional version of AutoCAD for educational purposes absolutely free.
If you have problems registering or installing the program, be sure to read our article “Registration on the Autodesk Education Community website” and “”. In the meantime, we assume that AutoCAD version 2018 or lower is installed on your computer. But not lower than 2013.
How to start working in AutoCAD? Begin!
And so, look for a shortcut on the desktop to launch and launch it!
Quite a complex and powerful program, but despite this it can work on not entirely new computers. However, this depends on the complexity and size of the files you are working with.
In other words, if you have a large, complex drawing, it will require more processing power from your computer.
But launching a program is always a slow process. So be prepared to wait a bit.
You can speed up the startup of AutoCAD by installing the program on a modern high-speed solid-state SSD drive.
After starting the program you will see the program window:
We have specially highlighted the most significant elements of the AutoCAD window interface in different colors. And now we’ll tell you about each of them. Top/down, left/right and in order! J Let's go!
The red rectangle outlines the button for calling the main menu of the program, with which you can “Create a file”, Open an existing one, Save, Print or Export a drawing file to another format.
For example, in PDF format, for viewing on a computer where AutoCAD is not installed. Or for demonstration to the customer. There is also a list of the latest files you worked with for quick and easy opening.
Highlighted in green is the “Quick Access Toolbar”, which contains commands from the “Main Menu”, as well as other useful commands.
The contents of the panel can be customized; to do this, you need to click on the button with a small triangle at the end of the panel, pointing down.
The panel adaptation menu will open and by checking or unchecking the necessary “checkboxes” we add or remove command buttons from the panel.
The name of the program, license type and file name are displayed in the center of the title bar of the window. "Drawing 1.dwg" is the default AutoCAD file name and will change when we save the file under our own name. ".dwg" is the AutoCAD file extension. Because of this abbreviation, Russian-speaking users also call AutoCAD files “devegeshki”.
On the right side of the title window is the Cloud Menu, which allows you to access help information and Autodesk cloud services.
Below, in blue, the “Command Tape” is highlighted. AutoCAD, like many programs, has a modern “Ribbon Interface”, which allows you to optimize the window’s workspace.
By providing the user with access to the necessary commands in a minimum number of mouse clicks.
The name of the “active” command ribbon in the figure is underlined with a blue dotted line “Home”. Clicking on other tabs will activate navigation to them.
Each command ribbon is divided into "Areas". For example, in the figure blue The “Drawing” command area is highlighted in color.
The names of the areas were not chosen by chance. They tell the user which command buttons are collected in this area.
For example, the buttons in the “Drawing” command area are responsible for creating 2D primitives and other elements (circle, rectangle, arc...).
Button UI element
Separately, I would like to note an element of the interface of the command buttons, which is found in different areas of different buttons - this is a “small triangle” pointing downwards.
It tells us that this button is responsible for several logically combined commands. Simply put, this button can execute not one command, but several.
For example, clicking on the triangle/arrow next to the button with the command to construct a “Rectangle” opens access to the button for constructing a “Polygon” or, as it is now called in AutoCAD, “Polygon”.
The number of additional command buttons may be small (a couple/three new commands). Or, as in the case of the “Circle” team, a rather impressive list of new teams will open before you.
The same small triangle/arrow that we saw earlier on the quick access panel. To open the panel adaptation menu, it is also found near the names of the command areas.
Clicking on it will open access to additional buttons, the commands of which are used less frequently than those that are always present in the area.
Yes, I would like to note the fact that not all commands are present on command ribbons and panels. Some commands can be run from the command line, but we'll talk about that later.
And so, we remind you that we are looking at the “AutoCAD Program Interface” using version 2018 as an example. Having studied the main elements of the upper part of the program window, we move on to the main workspace of the AutoCAD program.
The workspace begins immediately after the command ribbon. It is titled by shortcuts or tabs of open files. They are highlighted with an orange rectangle in our picture.
How many files can be used in AutoCAD at the same time?
AutoCAD can work with several files simultaneously. And instead of the tabs “Drawing1”, “Drawing2” you will have the names of these files.
The working field is represented by “infinite space” or “model space” divided into cells. It is here, in model space, that we will create 2D primitives, circles and rectangles. Use the “Polyline” tool and, by editing all this, get a finished drawing!
There is a “compass” in the upper right corner of the working field. Or it is also called a “view cube”. It is circled in purple.
His job is to help us. Find your bearings in the model space, since in AutoCAD you can not only create 2D elements, but also model in 3D, but first things first.
Also, below the view cube, there is an additional panel that allows you to control the view of the workspace.
At the bottom of the window, there is one of the most important interface elements - the “Command Line” or “Command Line”.
She's highlighted yellow rectangle in our drawing. Here you can “manually”, using the keyboard, give AutoCAD commands to perform various actions, be it creating elements or editing them, and in general, system commands.
Also, yellow The rectangle marks the tabs for switching between “model space” and “sheet space”.
We will look at them in our next articles. As well as the panel highlighted in red, where there are buttons that enable or disable additional modeling modes.
This concludes our article. We looked at the AutoCAD program interface and got acquainted with the basic concepts of the program window.
And now we already know where and what to “press”! Now you can try to click the mouse yourself, selecting various commands for constructing elements.
And in the next article we will look in detail at the commands for creating 2D drawing elements.